Tuesday, February 23, 2010

Thick and Juicy Fun with Curtain Panels

I really like the curtain panels in Revit.  They're fun.  While playing with the templates, I realized that I could add thickness.

That's great!  So following the precedent set by Carl's Jr, I figured that 'Thicker is Better'...And here we go....Start with a sexy, curvy form like this:
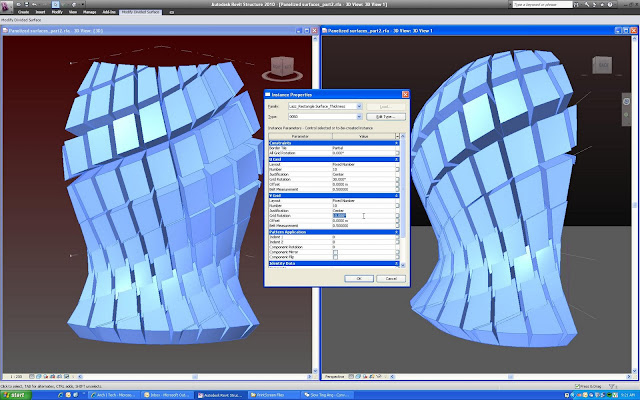
Apply the pattern surface, in the properties panel I adjust the thickness to 20m...Nothing succeeds like excess.
Nice!  Now lets add a twist...

and playing around a bit with the number of panels and their twist angles, it gets real thick and juicy....somebody get me a napkin...

Tuesday, February 9, 2010

Chinese New Year

Hooray...Singapore is closed for a week!  I'm going on vacation...


enough already....

Saturday, February 6, 2010

Spring is in the Air

I have heard that you can model springs in REVIT and had seen some images of them.  So i decided to figure out how.  In some ways, BUILDZ kind of beat me to the punch with the posts on helixes, which are essentially the same thing...but i was attacking the problem from a different direction...because i believe that anything worth building is worth over-building!  Links to both the models shown here are at the bottom of this post....

First, I created half a coil using a parameter driven reference arc with lofted circular profiles as such:


Then I nested the arc into another family, hosted on a rotating reference plane so it would tilt in elevation.  This is important to note for later because the radius of my coil segment is no longer equal to the desired radius of my spring:


Now, I nest my rotated coil into a third and final family, where i create as levels as i want.  Each coil of the spring is located on its own level and rotated 180 from the half coil directly below.


The distance between coils and the desired spring radius drives the coil radius and rotation and is shown in the formulas.

and i am now falling asleep because this form is sooooooo boring!

So I decided to try again, but this time I added some monkey-business.
Going back to the creation of the initial coil, I figured that I could use an ellipse for the loft path.  To make the piece more dynamic, I added a pair of elliptical profiles hosted on reference points, to the path.

This is the parameter list for the final model.  Similar to the simple curve except for the "Start Profile" and "End Profile" parameters which control the position of the refrenece planes along the loft.  I also programmed in a "Transition PCT" so the end lengths could be controlled as a percentage of their allowable length.


And now the form gets a bit more interesting...


With a bit more work, i could probably sort out how to expand the springs as they get taller.  Something to throw in the pile for later.

The Round Spring model can be found here:


The Elliptical Spring model is here: 


Helix Methods at BUILDZ:

Monday, February 1, 2010

Reader Email: Millenium Hilton WTF?

I got this email yesterday, and i thought it would be worth posting up.  If you send me a good question, I'll post your email too!  And if its a really good question, I'll send you a bag of tasty Peppridge Farm cookies to boot!


Hi Troublemaker,

I am 31 years old currently working here in Dubai as CAD Technician.

I am hoping to learn Revit as much as I can. I browse the internet for some tutorials and I am happy that I can little by little learn from it.

I have seen in YouTube the sample of your Massing Study for the Millenium Hilton. Since the pacing is very fast and its hard for me to follow how did you do it, i would like to ask a favor, I am just trying for my own self study, to have a copy of your Revit file for me to review. By the way I am just new in using a Revit and I find it interesting to learn. I am more on AutoCAD and Microstation only.
Best regards and more power,

Allan

--------
Hi Allan,
I am happy to help you out, not too long ago, I was a complete newbie at this too...I had to figure out alot of it on my own, which may or may not have been a bad thing.I can’t share the whole model, but i will tell you what i did, and i'll send you the head piece to take a look at.

 
LINK TO MILLENIUM HEAD MASS.RFA
When I model, I usually create several 2d families that i use as profiles for my work. So the crown is basically one nested 2d family, copied onto 3 levels, with it’s parameters linked into new parameters in the host family. I then picked all 3 profiles and hit 'create form'….voila!

The body of the tower was similar. I made one 2d family for the base level, one for the top of the taper, and another for the ordinary rectangle at the top. The base profile was toughest because i had to figure out how to control the curvature. I ended up creating a curve that i controlled using dimensioned reference points.

There are a couple of key things to keep in mind.

1) If you use 2d families as profiles, it helps to host them on a reference plane that moves, rather than trying to dimension them vertically. Alternately you can use the offset control, but I stay away from that for no reason other than preference.

2) Think the whole thing out ahead of time. Break the form down to its constituent parts and the model will get alot easier. You will then see what needs to transform and what doesn't. With that understood, figuring out which parameters will have to be linked between the nest and the host will be a snap.

The bulk of what you are seeing in Massing Study for the Millenium Hilton video is me placing these profiles in the host family and linking the parameters.

Start small, start easy...find a simple building near you and just figure out how to model the mass....That’s what I did to learn Revit.
Thanks for writing.
TBT