Sunday, May 29, 2011

BIM Related Lawsuit: Sounds like Trouble to me....

A board member at a very successful architectural practice once told me that "We get paid to DESIGN the buildings, not build them"

Case in point from Architectural Record:
BIM Lawsuit Offers Cautionary Tale

How long until this story gets blown wildly out of proportion?

Tuesday, April 26, 2011

BCA Buildsmart Conference

Speaking at BCA Buildsmart today.


Can you spot the troublemaker in this lineup?

http://conference.sgcpw.com/build-smart-conference/speakers-biographies/track-1-bim-and-construction-i-t/

Sunday, April 24, 2011

Revit Server Et Tu!

We installed Revit Server on my current project because we had to leverage labor from remote offices in Australia. We also had some staff available from an office in Spain.

Getting their help seemed like a really good idea at the time, but there was a bit of a challenge with the language barrier. Luckily, we have a wonderful woman on staff from mexico and she was able to translate the instructions...instant classic:

La ventaja del SERVIDOR DE REVIT es que no debe usted de crear directories o nada en su maquina local. Tampoco tiene que copiar cosas atravez del servidor, no se tienen que recrear los directories.  Todo lo que necesita hacer es seguir estas instrucciones:


Primero asegurarse de que esta conectado al servidor correcto


Paso 1) Atravez de la pestana que dice “Collaborate”, hacer click como se indica


I can't post the whole document here, but it was a really fun exercise...

Este es el paso mas importante, cuando usted abre uno de estos modelos, cerciorese de que el boton de Crear New Local esta activado como se muestra abajo.


Viva La Raza! Viva La Revolucion! Viva Revit!

Sunday, April 17, 2011

Lego Architecture

This is pretty cool for anyone in the DC based CAD/Design-geek community!  The Lego Exhibit at the National Building Museum in DC!


Blogger Review:
http://designquarterly.com.au/events/sky-scraping-lego

Museum Website:
http://www.nbm.org/exhibitions-collections/exhibitions/lego-architecture.html


Friday, April 8, 2011

Steppin Out Thick

Heres a weird problem a user flagged up to me the other day.

He had a simple, Monolithic (Concrete) Stair...like this one:


But we needed to make the stairs 500mm thick for blast purposes.  So he changed the parameter:


And got this:


Weird huh?  That first step is a doozy!  And the second ain't much better.

Any thoughts from the Global Revit Hive-Mind?

Thursday, March 31, 2011

Family Abuse - Curtain Panel By Patterns Edition


I cut my teeth in this BIM thing using Architectural Desktop (ADT).  I loved that program a lot.  I still have a real fondess for it, but that's a moot point for this column.  At my first AU conference, i saw a presentation about using RAIL objects to model any type of repetitive, linear element.  I loved the concept and quickly started playing around.  But all that is old news now...

I struggled for a while trying to figure out how i could use the same "RAIL" logic of modeling repeating linear elements in Revit.  It seemed to me that the rail tool in Revit is a bit more rigid in what type of objects it accepts....maybe i am not looking close enough...and then one day POW! It hit me like a bolt from the blue.  CURTAIN PANEL PATTERNS could be the way!

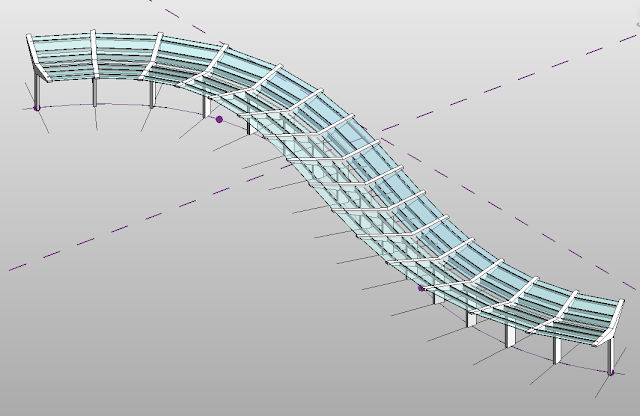
First thing I did to test out this theory was to create a reference line CURVE BY POINTS and then hit the CREATE FORM button to give myself a surface.  I divided the surface and it looks like this:


Because i made sure to use a Reference Line, I can grab any of the driving points and adjust the curve manually later.  These points could also be parameter driven if you want that kind of control.


The next step involves creating a Curtain Panel Pattern based upon the RECTANGLE template.  Zach and Robert Manna did a great presentation at AU last year that involved a good discussion on how to control the behavior of the reference points.  You will need to understand this behavior in order to make this type of model work.  Go download the handout here:

Au Bon Panel: Baking Your Own Adaptive Components and Panels with Revit

The bit I am concerned with starts on page 6.  Have you looked it over?  Good.
In this case I am making a linear canopy.  I like using nested objects so I went ahead and made a generic mass to act as the repeating vertical element.  2 things to notice in the image below:

1) The object is being built in plan.  This is because of how i planned to mount it on the reference planes in the curtain panel.  The lesson is that in this exercise UNDERSTANDING YOUR HOST PLANES, HOST POINTS AND ORIENTATIONS ARE CRUCIAL!!!

2) The top mass is transparent so you can see the line work I drew.  These lines will control the shape and location of my glazing panels and horizontal mullions.  Its easier to set up any desired sectional parametric relationships here.  Trust me!

Now if you have read Zach and Robert's Handout, you will be very clear of about whats going on in the picture below.

1) I set up the offsets for the reference points as they describe.
2) Then i connect the offset point to the adaptive point upon which it is hosted with a reference line.
3) Host a point on that reference line
4) Host my generic mass on that point, in proper alignment.
5) Create reference lines on any section guidelines and create desired horizontal forms.
6) Try again because I did it wrong the first time (repeat as needed)


Load that into the curved surface family, apply it to the divided surface and once you have done it all properly... you'll get this:


When I did mine, i noticed that the end pieces looked funny.  That condition went away when i adjusted the border tile settings:


And once you get it sorted in 2d, you can pull the curve's driving points vertically....

Download the family here:
Curtain Panel Canopy Model.rfa

And the stage is now set for The REVIT ROLLER COASTER Plug-in...I hear its in the works for the 2013 release...


Sunday, March 27, 2011

Degrees, Diameters and Exponents

"%%D Doesn't Work!!!!"

I can hear the converts from AutoCAD chuckling....

I have been perplexed for a long time about how to get different symbols to come up in my Revit annotations.

The degree symbols, diameter symbols, exponents, greek characters.

The other day i finally got off my lazy but and did a search.  Google sent me to Revit City and I found this a forum post on how to do it:


Forums >> Revit Building >> Technical Support >> how to type degree symbol in text

To check the mapping on your machine, go to your START BUTTON and follow this:


Its takes you to the character mapping set and you'll get this panel:


and this...


and this...


Mapping is indicated in the bottom right corner and I am a happy man...

Yeah i know its old news but cut me some slack, i am still pretty new to the party...