One of the perks of being based in Asia is that the travel opportunities are phenomenal. A Burmese friend invited me to join him for a trip to visit his family in Myanmar. Of course, I accepted and we spent a few days in Yangon and Mandalay. At the end of the trip, he took me to a place called Bagan where there is a countless number of 1,000 year old brick pagodas like these:


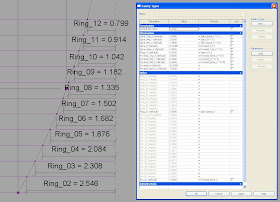
As i spent the day in a horse drawn buggy, trotting across the desert looking at these forms, I started to wonder how to generate them in Revit. I took particular interest in the textures and rings of the spires:

After trying a couple of different methods, it ended up being a really neat experiment in the use of curtain panels and the reporting parameters feature in 2011.
So here we go....
First thing i did was set up a pair of 3-point curves which i would use to set-up my elevation profiles. By attaching parameters to the driving reference points, i could refine the shape later:
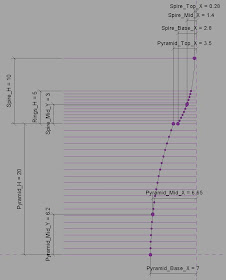
Each horizontal line represents a horzontal division of the model. I will use this to get the stepped effect later on but first i had to place reference points at every intersection. I simply placed the points on my curve and then pressed the HOST POINT BY INTERSECTION button. I selected the line i wanted to link for the intersection and it worked like a charm.

Now that point will ALWAYS be where the line and curve intersect....And I can now put a reporting parameter to it that will come in handy later:

Now that point will ALWAYS be where the line and curve intersect....And I can now put a reporting parameter to it that will come in handy later:
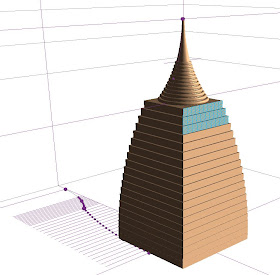
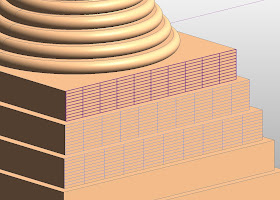
Next i had to make my curtain panels using the Panel Pattern Templates. First i made a slab and a disc mass family:


Then nested these in to an OMNI GRID 2x2 Panel Pattern:


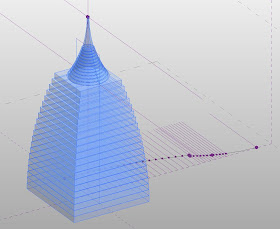
With this accomplished, I go back to my profile model and set up a pair of surfaces to divide and apply my pattern:


Several of my Hindu and Buddhist colleagues got a real kick out of seeing this model on my computer screen as the work progressed. They all had a deep religious connection to forms like this.
At the end of the exercise i noticed something very interesting as well, By burrowing down into my selection, I could actually divide the surfaces that made up the individual slabs....This would allow me to apply further textures and ornament to each individual panel element....This is a rabbit hole that goes down pretty far!
Model for Download:
More pictures from Burma:
thank u for helping us with this post for any services click belowBIM Implementation
ReplyDelete